Wednesday 16 July 2014

Recipe: Potato & Spinach Soup

I'm not really a soup kind of girl but when I tried this one I absolutely loved it!!  It is seriously easy and doesn't take very long at all to make...

Ingredients:

  •  5 cups of chicken stock
  • 750 grams of potatoes (peeled & chopped)
  • 3/4 of a cup of light cream cheese or sour cream (whichever is in your fridge)
  • 1/2 - 1 bunch of spinach (the more spinach, the stronger the taste)
  • 1/3 of a cup of parmesan cheese

Process:

STEP 1:
Place the chicken stock & potatoes in a  large saucepan.  Bring the stock to the boil.  Then reduce the heat and simmer for 5 minutes until the potatoes are tender.


STEP 2:
Meanwhile wash the spinach, remove stalks and shred the leaves roughly.
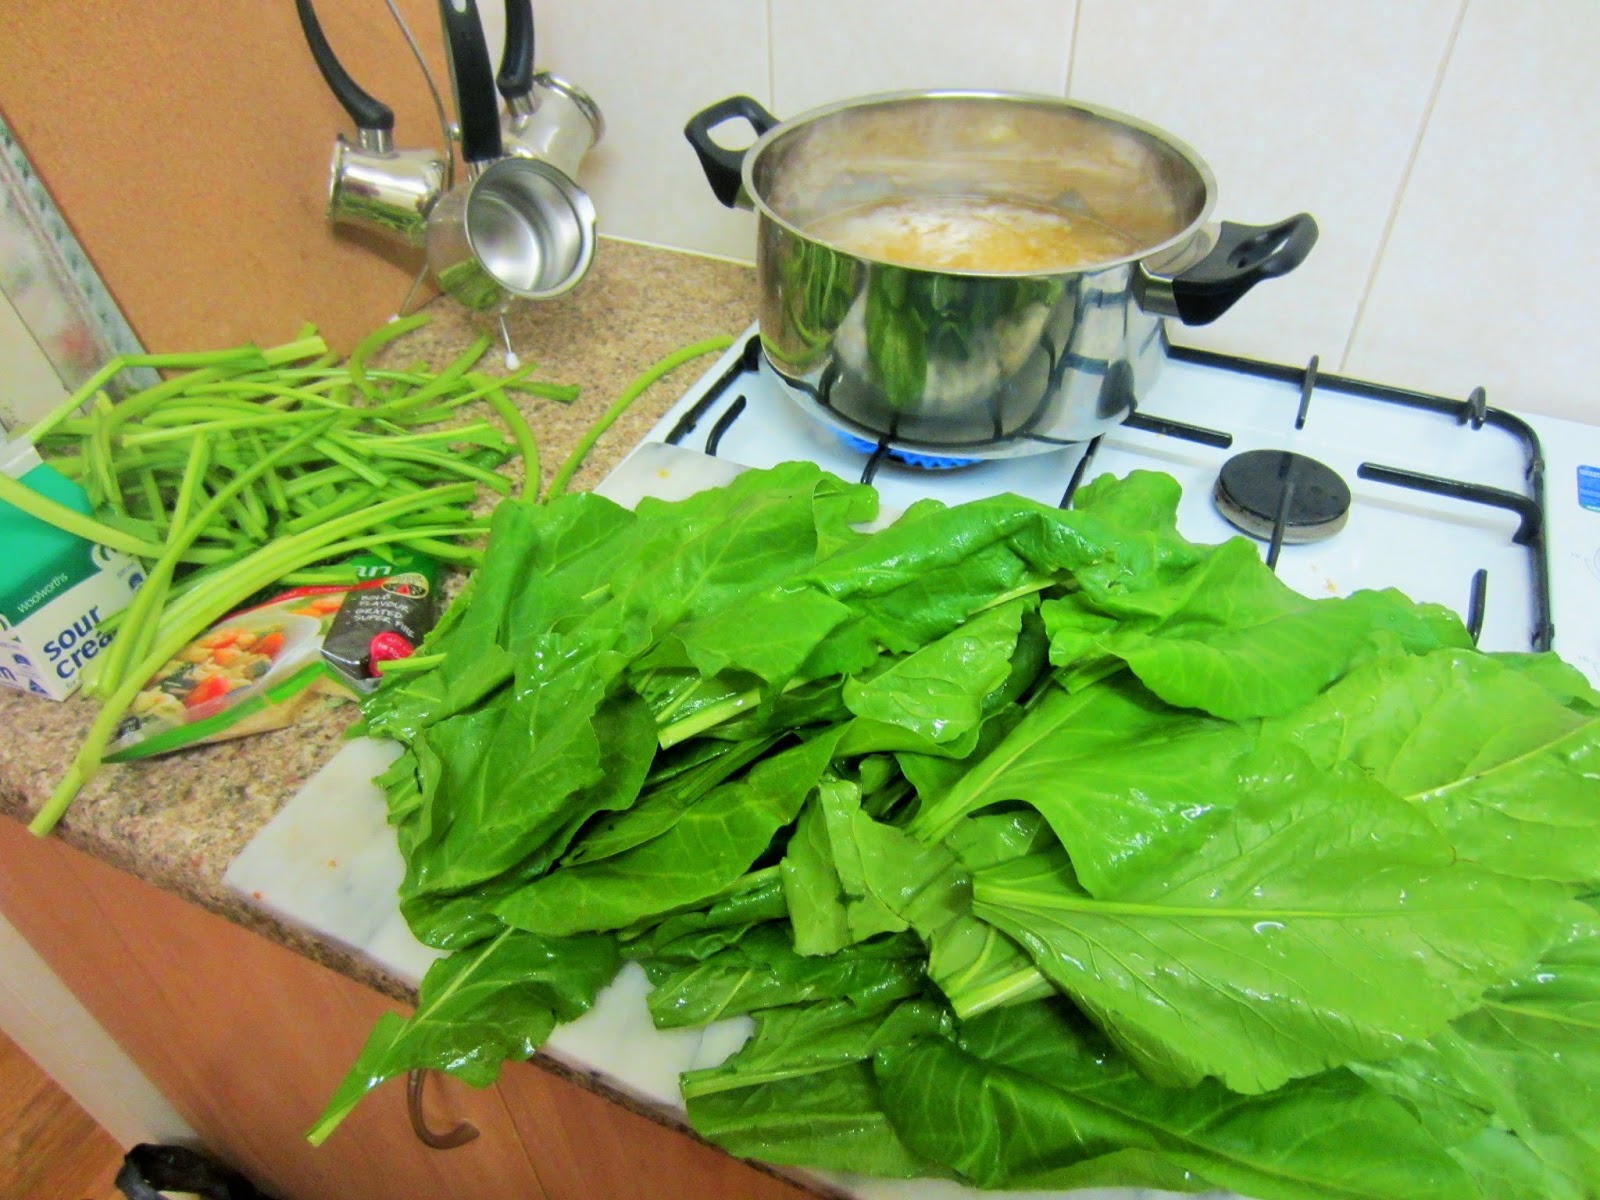


STEP 3:
Add the spinach to the saucepan and simmer for 3 more minutes.


STEP 4:
Add the cream cheese/sour cream and parmesan cheese to the saucepan.  Stir the mixture thoroughly.


STEP 5:
Remove from the heat and blend using a soup blending tool of your choice.


Review of Recipe:

The soup will be ready to eat straight away.  It freezes well and can be reheated on the stove using a small saucepan.  I serve it with thick slices of bread and butter and it is absolutely delicious.  A tip I give is to get all your ingredients out on your bench and measured so that you don't stress out.  If you find you simmer the soup a bit longer than the times above don't worry as this recipe is hard to mess up :)  The soup doesn't exactly look appetising but it tastes soooo good!


Let me know if you have any questions about this recipe and definitely let me know if you end up making it!  As always I'd love any suggestions for recipes to try so let me know!


Wednesday 14 May 2014

Recipe: Spag Bol

This recipe is an oldie but a goodie!  I think everyone would have had a variety of Spaghetti Bolognese however this is my twist on it :)

Ingredients:

  •  500g of Pasta - you can use any type of pasta you want!
  • 1kg of beef mince (or chicken, lamb, veal...)
  • 1 bottle of pasta sauce (I like to use ones that include "hidden vegies")
  • tomatoes roughly chopped
  • 1/2 a medium capscicum finely chopped
  • 1 carrot thinly sliced
  • 2 cloves of garlie
  • 1 medium onion finely chopped
  • salt, pepper, your choice of spices
  • grated cheese (to top your pasta with)


Process:

STEP 1:

Prepare all your ingredients as per list above (e.g.:  slice, chop, grind, etc... you get the point!)


STEP 2:

Add a small amount of oil to your electric frypan and brown your onion and garlic.


STEP 3: 

Meanwhile, bring about 5 litres of water in a large stock pot and add your pasta, cooking as per instructions on it's packet.


STEP 4:

Then add your broken up mince to your fry pan and brown.


STEP 5:

Add the vegies and sauce and mix.  Then let this simmer on low while your pasta finishes cooking.


 STEP 6:

 Drain pasta in a colander and return to stock pot.


STEP 7:

 Mix your mince mixture into your pasta and serve directly from stock pot.


Review of Recipe:

This is by no means the first time I have cooked this recipe nor the last.  It is one of the easiest things to cook because all you're really doing to "frying" everything and then mixing :)  That being said I really enjoy cooking this and I love adding in all the vegies!  I make this differently every time depending on what I have in my fridge & pantry.


Let me know if you try this recipe or if you add anything good to your spag bol!  Also recommendations for other recipes I should try are always welcome :)


Wednesday 7 May 2014

Recipe: Roast Potato Salad

This is going to be quite a short recipe without pictures but I promise that next time I make this I will update this post.  My friend gave me this recipe because every time she makes it I rave about how good it is!


Ingredients:

  •  Potatoes  (use about 2 medium potatoes per person)
  • 1 cup of mayonnaise
  • 1 cup of sour cream
  • 2 heaped tablespoons of Wholegrain Mustard


Optional Ingredients:

  • Grated Cheese
  • Fried Bacon (diced)
  • Sweet Potato


Process:

STEP 1:
Preheat your oven to 220 degrees celsius and line a deep roasting dish with baking paper.

STEP 2:
Chop the potatoes into approx 5cm cubes (roughly) and roast for about 45 minutes.
(Note:  Roast your potatoes as you would usually.  If you are using sweet potato as well use half potatoes/half sweet potatoes.)

STEP 3:
Mix the mayonnaise, sour cream and wholegrain mustard together in a small bowl.

STEP 4:
Put your roasted potatoes into your serving bowl (or on a platter if you would like) and drizzle the dressing over them.
(Note:  You will not necessarily need all the sauce so don't just chuck it all on there.  When I made this for FIVE people I used about 3/4 of the mixture.)

STEP 5:
You are now ready to server your delicious Roast Potato Salad!  If you have included the extras then sprinkle cheese over the top and mix in the diced, fried bacon.


Review of Recipe:

I really loved this salad as it was extremely easy and cheap to make.  There aren't many ingredients and it is easy to make alternatives.  I love finding recipes that I know will become a regular and I know this one is one of those!


 Let me know if you make this recipe and make sure you check out my other ones!  Also I'd love to know your ideas on what I should cook next!  (A chocolate chip cookie recipe coming soon!)


Monday 28 April 2014

Recipe: Chocolate Banoffee Pie

  On the weekend my husband & I had visitors for lunch and then tea on the same day.  Literally as one couple left the other couple (and their adorable kiddies) arrived so it was quite a big day for us.  I went simple for lunch just doing a barbeque and then a fruit platter for dessert.  With tea we had a barbecue again but I made potato salad (recipe coming soon) and a Chocolate Banoffee Pie.  They say you should never cook new things when you are having people over but I did and they both worked out!  :)


Ingredients:

  •  250g McVitie's Digestive Biscuits
  • 125g butter (melted)
  • 380g can of Nestle Caramel Top 'n' Fill
  • 2 - 3 bananas (sliced)
  • 300ml thickened cream
  • 2 Cadbury Flake bars (crumbled)
 

Process:

STEP 1:
 Put the biscuits in a sealed bag and smash them with a rolling pin until they are all broken up.  Place crumbed biscuits into a bowl and add the butter.  Combine ingredients.

STEP 2:
Cut baking paper to size and line a tart tin.  Press biscuit mixture into the bottom of the tin and around the sides, trying to make each side even.
Then place the tin in the fridge to chill/set for one hour.

STEP 3:
Spread the Caramel over the biscuit base, again trying to make it as level as possible.  Arrange the banana in a single layer over the caramel.

STEP 4:
Whip cream in a bowl using electric beaters until soft peaks form.  Top the pie off with the cream and sprinkle your chocolate pieces over it.
And then... TUCK IN! :)
(Note:  I bought lite cream accidentally and as you will see in the pictures it didn't whip very well.  So I would suggest full cream, though the pie still ended up delicious!)


Review of Recipe:

Everyone loved this pie especially the base which shows it pays to spend a bit more on the right biscuits.  I will definitely be making this again as it was extremely simple and doesn't take long at all!  This can be kept in the fridge for a couple of days after making it however the bananas will taste the best the first day.  This recipe is a good way to use up bananas that are a bit "past it" though it would taste good with fresh ones.  You can put whatever chocolate you want crumbled on top or nuts would make a nice addition.


 Let me know if you make this recipe and make sure you check out my other ones!  So far I have really surprised myself in that everything has been simple and turned out really well!  As always let me know if there is anything you'd like me to try to cook!


PS:  Sorry there wasn't step-by-step photos of this one.  I finished this off while my visitors were over so I didn't really want to whip out the camera! :)  That said it was really easy so you probably don't need them - this recipe tends to correct itself.

Thursday 10 April 2014

Recipe: Chocolate Ripple Cake

Chocolate Ripple Cake was always a favourite of mine as a kid.  I don't really know why as I never really was the biggest fan of cream.  But I loved this cake and always requested it for my birthday.  So it was an obvious choice for my first "sweet" recipe in my two a fortnight challenge.

Chocolate Ripple Cakes are extremely easy to make and look quite impressive when you cut into them.  I didn't take step by step pictures just because I really didn't think you needed them.  So here we go...

Ingredients:

  •  500ml of cream
  • 1 teaspoon of caster sugar  (I didn't have this so I used 1/2 tsp of white sugar & 1/2 tsp of icing sugar - I think you could just use white sugar)
  • 1 teaspoon of vanilla essence
  • 1 packet of chocolate ripple biscuits


Process:

STEP 1:
 Put the cream, sugar and vanilla essence into a bowl and beat on medium speed until thick and peaks are forming.

STEP 2:
 Spread a layer of cream on a platter (this will make your base).

STEP 3:
Using a knife or spatula cover both sides of a biscuit with approximately 1/2cm thick of cream.  Then get another biscuit and stick it onto the first biscuit and cover the blank side with cream.  Continue with this until you have used up all the biscuits.
(You can make any shape of cake you want.  You can put the biscuits side by side or in rows or on top of each other.)
If you don't know what I mean by this step, see below for pictures :)

STEP 4:
Cover the entire cake with the remaining cream and put in the fridge for at least 6 hours.  (I put it in for nearly 24 hours and it worked even better!)


As you can see below I didn't try too hard to make the cake look perfect...


However when you cut into it, it looks really effective...


 To make the cake a bit prettier you can sprinkle grated chocolate or cocoa powder over it.  Also adding things like raspberries or thinly sliced banana would be amazing!


Review of Recipe:

My husband and I really enjoyed this cake and it was just as I remembered it!  I am taking the rest away with me this weekend with my parents so I hope they will like it too!  It is a very simple recipe and is a good one as you can make it ahead of time.  I will definetely be making this again soon and adding a few extras as I mentioned above :)

Do you have any cakes or other meals you used to have as a child?  Let me know and I'll attempt them :)


Sunday 6 April 2014

Recipe: Barbecued Corn & Chorizo Salad

Woop Woop!  First Recipe up finally and I am so excited!!  And as you would have guessed from the title I made the Barbecued Corn and Chorizo Salad from www.taste.com.au. And it was a BIG success :)  I have never been that adventurous with salads; I usually just do a garden or Greek salad which is quick and easy.  But I really wanted to expand my repertoire.

Ingredients:

  •  4 corn cobs (with the husks & silk removed)
  • 2 chorizo sausages (approx 125g each) - slice these into 1.5 cm slices
  • 1 medium capsicum (finely chopped)
  • 1 medium avocado (chopped)
  • 100g baby roma tomatoes (I quartered cherry tomatoes instead)
  • 1/2 coriander leaves
  • 2 tablespoons lime juice 
  •  

Process:

STEP 1:
 Put the corn on a microwave-safe plate and cover with cling wrap.  Microwave on High (100%) for 4 minutes.


STEP 2:
Prepare all your ingredients as per list above (e.g.:  slice, chop, grind, etc... you get the point!)


STEP 3: 
Turn your BBQ onto medium heat, cooking corn for 8 - 10 minutes (turning every now and again).  Once browned let it cool on a plate while you cook the chorizo.  Cook the Chorizo for about 2 minutes until browned all over (turning this quite often)


STEP 4:
When the corn has cooled down a bit (should be ok once you have completed step 3) use a sharp knife to slice the kernels off the cob.


STEP 5:
Place all ingredients in your serving bowl, season with Salt & Pepper and toss to combine.


Review of Recipe:

I loved this recipe and will definitely make it again.  The flavours go together so well and I love the smokey flavour of the chorizo mixed with the sweet flavour of the corn and the kick of the capsicum and lime juice.  My husband doesn't like corn and he still ate this salad and really enjoyed it.  We ate this by itself for tea one night when we weren't very hungry and it really filled us up.  I can't wait to make it again!  Also the fact that it takes under 20 minutes to make is an added bonus!

(Notes: I didn't feel like going outside to cook on our bbq so just used our electric fry pan on medium heat.  I also didn't have coriander leaves so I ground seeds instead and it worked fine.  I also suggest putting the avocado in last as it can break up when you toss the salad.)


Let me know if you try this recipe or if you have any recipes that you think I should try!


Wednesday 26 March 2014

The beginning of something special

Hi Guys!!!  I am super excited because I am starting another blog!!  If you haven't read my other blog I also write a lifestyle/beauty review blog called Thinking About April so make sure you check that out too :)  But I have decided to create another blog so that you can follow my journey of me learning to cook.

The meaning behind the name "Learning 2 Cook" is that every fortnight I will be cooking two new recipes:  a sweet and a savory dish.  I really want to get more confident in my cooking and step out my comfort zone.  This blog might be a bit raw at the start (haha... using food terms already) because I'm working on two blogs but hopefully they will both improve in time!

So I hope you will enjoy my journey and perhaps come along with me!  This week I am starting easy with a salad and I haven't decided on the sweet yet.  Let me know if you try any of the recipes I try or if you have any ideas on what I should cook in the next fortnight!

I hope that together we can LEARN TO COOK! :)